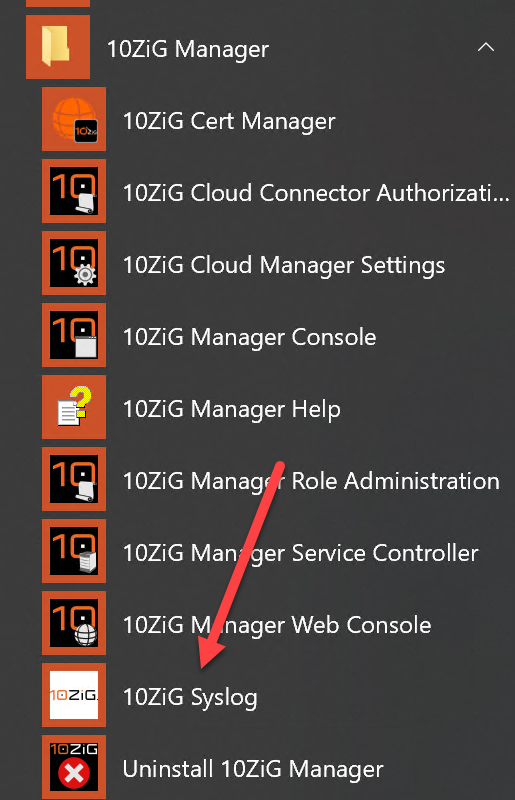
SIGN UP TO RECEIVE TECHNOLOGY & FIRMWARE UPDATES
Quick setup instructions & detailed user guides
SIGN UP TO BE A PART OF THE 10ZiG BETA PROGRAM
Search Keyword
Choose Product
PeakOS™ and NOS™
Please click here for the 10ZiG Technology security vulnerability statement.
The Parallels x64 Linux Client is currently available as an addon for PeakOS 64 firmware. Existing NOS 32 (10.12.x) and PeakOS 32 (12.x.x) customer’s are required to convert to PeakOS 64 (16.2.x) firmware in order to support this. Contact 10ZiG Technical Support here for obtaining the firmware and Parallels addon.
The USB video device class (also USB video class or UVC) is a USB device class that describes devices capable of streaming video like webcams, digital camcorders, analogue video converters, and still-image cameras. 10ZiG supports all UVC based Webcams across NOS/PKOS/RepurpOS platforms.
10ZiG has tested these specific webcam models*:
Make |
Model |
Logitech |
B910 |
Logitech |
C920 |
Logitech |
C270 |
Logitech |
C930e |
Microsoft |
LifeCam HD-3000 |
* supported webcams are not restricted to those listed. For more information please, contact support.
The USB redirection feature that can be installed with Horizon Agent
does not support webcam redirection. If you redirect audio input
devices through USB redirection, the audio stream does not synchronize
properly with video during Real-Time Audio-Video sessions, and you lose
the benefit of reducing the demand on network bandwidth. You can take
steps to ensure that webcams and audio input devices are redirected to
your desktops through Real-Time Audio-Video, not USB redirection.
Ensure that Session Reliability is enabled under Control Panel / Citrix Settings / Advanced. Note: This is enabled by default in firmware 10.12.166 or higher.
To start, please ensure that you are using either thumb drive that is formatted in FAT32 or NTFS. Then copy your firmware files that were provided to you, to the root of the thumb drive.
Factory default your unit: Go to settings… open the System Information applet and go to Advanced then click on the Factory Default… button.
Once you have factory defaulted your unit, go to Settings… and then Security Settings. Inside of the Security Settings applet, please check the box next to Enable installation from USB storage, then click the OK button.
With this setting enable, please insert your thumb drive into the unit and wait for the prompt to show up. If it is not already on the Firmware Update tab in the left hand pane, please click on that option to switch to that tab. Once there, click on your firmware file to highlight it and then click on the Install button in the lower right hand corner.
The ESC key will enter the BIOS
On our Linux NOS™ and PKOS™ models press CTRL+F12 to disconnect from session. You must be at 10.12.156 or higher (NOS™) or at 12.0.127 (PKOS) or higher for this to work.
The DVI-I (dual link) port furthest away from the power cord.
This is caused by the session launching using the “light receiver
When the Citrix receiver is run in full screen mode, the receiver grabs ALL input.
Possible solutions:
Use the screensaver in the Citrix session and disable the PeakOS™ screensaver.
Switch to desktop mode and run the Citrix session in a windowed mode.
Please see the document below:
How To Connect To A Terminal Server that requires NLA (Network Level Authentication)using RDP.docx
CTRL+F4 will exit the browser
Please watch this 80 second video which shows the easy process.
This requires TWAIN scanner integration on the thin client side and we do not currently have this implemented on our Linux thin clients.
There are two options to the ICA Global applet having to do with HDX web cams. They are “Enable Audio Input
Make certain you check use NLA, FreeRDP needs the box checked in order to extend the desktop or it will span.
Mounting instructions can be found HERE.
Windows Pro as a host does not support multi-monitor, you must use Windows 7 Ultimate or Enterprise for multi-monitor support.
When you get to the screen below DO NOT take the option to INSTALL but rather select Skip to Log On underneath the green INSTALL option
If you take the option to INSTALL you will be presented with an option to download a file. Cancel out as the Citrix Receiver is already installed but Firefox is not aware of that install at this point.
From Terminal Properties - Control Panel - ICA Global Properties and set the display preference.
You can create a script to start the share and restart if necessary.
- Create a new Shell Script session in the connection manager.
- Use the example below to create the share script, replacing the parameters within < > with your share information.
mount -t cifs //<ip address>/<share name> /tmp/mnt/<description> -o username=<username>,password=<password> - when the script content is complete, select the X at the top right of the window and select Save when prompted
- From the configuration tab, highlight the connection and select Startup. Select the options to enable autostart. You can always start the session manually if necessary.
To enable Font Smoothing in Citrix, go to Control Panel -> ICA Global Settings -> Advanced and select the "Edit wfclient.ini" button. This will bring up an editor
Add a line FontSwitchingType=n in the [WFClient] section.
n=0 then font smoothing is disabled
n=2 then use standard font smoothing
n=3 then use ClearType font smoothing (recommended)
In the image below, ClearType font smoothing is enabled.
The Linux thin client OS is currently limited to two DNS servers.
Download it here
In Terminal Properties - Control Panel - Global ICA Settings - Advanced - Edit wfclient.ini and change TransparentKeyPassthrough to "Local". Currently it it set to FullScreenOnly. If it does not exist in the wfclient.ini you will need to add it. This will allow users to switch between full screen citrix desktops using (CTRL-ALT-UP/DOWN) and get to the connection manager using (CTRL-ALT-END).
This setting can be cloned to other units by using the 10ZiG Manager.
To support USB printing on V9:
- Define a USB printer on the thin client using the Generic RAW driver.
- Share it using RAW protocol.
- Change the 5250 configuration to use a RAW LAN printer with IP 127.0.0.1 as shown below:
FLASH PLAYER IS NOT AVAILABLE ON THE D520 SOC THIN CLIENTS (57Xx)
*** RDP now requires Flash to be installed locally on the thin client to play FLASH Videos (YouTube) ***
NOTES:
- When the flash player is not installed, if you execute a browser session with a blank URL you will go directly to the Adobe Linux Flash Player install page.
--- For a Citrix only thin client edit the Citrix settings and blank out the address for the Citrix server and then start the browser session -- - When the unit is factory defaulted, the flash player remains
- After installing on one unit, you can clone the flash player to other units using the manager template feature
- Firmware version >= 9.10.0 does not have the flash player installed from the factory. It must be installed using the procedure below.
- To check if the flash player is installed you can use about:plugins as the URL and it shows you the installed plugins....
- Users will be able to upgrade firmware versions < 9.10.0 - in this case they do not need to re-install the flash player.
!! Please make certain the date and time on the Linux thin client is correct !!
- To install the flash player define a browser session with a blank URL; the browser will go directly into the Adobe Linux Flash Player install page. Select Linux (32-bit) and Flash Player 11.2 for other Linux (.tar.gz).....
- Select the Download now button
- The flash player will automatically be installed. The browser will exit and the user is left with this message.
Note: THIS USB UPDATE/RESTORE FUNCTIONALITY IS ONLY AVAILABLE ON FIRMWARE LEVELS ABOVE 11.x.40 To install this feature on devices showing prior firmware levels than 11.x.40, please use the 10ZiG Manager to update your device to a firmware level above .40, reset to factory defaults.
- Format a USB drive FAT32 (minimum 1GB)
- UNCOMPRESS the standard 10ZiG firmware update .tar file and copy the contents to the USB drive (You may use WINZIP, 7zip, or your choice of uncompressing tools)
- Power off the D520 and insert the USB drive
- Power on the D520 BE PATIENT!
- Between 40-60 seconds after boot you will hear a tone and a verbal message, indicating restore is in progress.
- Once the restore is complete you will get another verbal message along with three chimes (which repeats if left unattended).
- Remove the USB from the D520 and reboot the unit and allow the device to boot to a fresh image.
DEPENDING ON THE READ SPEEDS OF THE USB DEVICE IT CAN TAKE 1-2 MINUTES, DURING WHICH TIME YOUR MONITOR(S) WILL BE BLANK HOWEVER, THEY WILL REMAIN POWERED ON.
Please contact tech support for a BIOS update that will support dual HDMI monitors.
Make certain you have firmware version 12.0.42 or higher. To get the best RDP performance on the L800, the “Disable Native Acceleration
Upgrading VMware Tools in a virtual desktop causes PCoIP connections to fail
Symptoms
- Connections to virtual desktops using PCoIP fail
- You are no longer able to connect to virtual desktops using PCoIP
- You have recently updated VMware Tools
For example, you have installed ESX 4.0 Update 2, which updates VMware Tools, and you are no longer able to connect to virtual desktops using PCoIP
Resolution
Prevention
To avoid this issue, do not upgrade to ESX 4.0 Update 2 if you are using View 4.x with PCoIP.
OR
You can install VMware Tools for ESX 4.0 Update 2 without the SVGA driver.
To install without the SVGA driver, after upgrading you VMware Tools package on ESX host, from vSphere Client:
- Right-click on the guest, and click Guest > Install/Upgrade VMware Tools.
- Ensure Automatic Tools Upgrade is selected
- Copy and paste the following text as it applies to your environment into Advanced Options:
Note: Do note include line breaks when you copy the text. The line breaks are for formatting purposes only.
For x86 guests:
/s /v "/qn REINSTALLMODE=voums REINSTALL=WYSE,VMXNet,VMCI,Mouse,MemCtl,Hgfs,VSS,VMXNet3,vmdesched,ThinPrint,Sync,
PVSCSI,Debug,BootCamp,Audio,Buslogic,VICFSDK,VAssertSDK,Toolbox,Upgrader,GuestSDK,
PerfMon,Common,microsoft_dlls_x86,ArchSpecific"
For x64 guests:
/s /v "/qn REINSTALLMODE=voums REINSTALL=WYSE,VMXNet,VMCI,Mouse,MemCtl,Hgfs,VSS,VMXNet3,vmdesched,ThinPrint,Sync,
PVSCSI,Debug,BootCamp,Audio,Buslogic,VICFSDK,VAssertSDK,Toolbox,Upgrader,
GuestSDK,PerfMon,Common,microsoft_dlls_x64,ArchSpecific" - Click OK. VMware Tools automatically upgrades in the guest, and the guest reboots.
Workaround
For customers that do not have a requirement to use PCoIP, you can use RDP. For more information on using RDP, see the VMware View Administration Guide.
For customers that are experiencing the issue and want to continue using PCoIP, use this workaround:
Note: VMware recommends that you have VMware View 4.0.1 installed prior to performing these steps.
- Log in to the affected virtual machine(s) with Administrator rights. This is any virtual machine that has the VMware Tools shipped with ESX 4.0 Update 2 installed.
- Rename the C:\Program File\Common Files\VMware\Drivers\Video folder to C:\Program File\Common Files\VMware\Drivers\Video-OLD.
- From a working virtual machine, copy the C:\Program File\Common Files\Vmware\Drivers\Video folder to C:\Program File\Common Files\Vmware\Drivers\ on an affected virtual machine.
- Click Start > Settings > Control Panel > System.
- Click the Hardware tab and click Device Manager.
- Expand Display Adapters.
- Choose VMWARE SVGA II. Right-click on it and choose Properties.
- Click the Driver tab. You are presented with the SVGA driver properties.
The version is 11.6.0.34 (Driver Date 01/03/2010). - Click Update Driver. The Hardware Update wizard displays.
- When prompted with the question, "Can windows connect to Windows Update to search for software?", click No, not at this time and click Next.
- When prompted with the question, "What do you want the wizard to do", click Install from a list or specific location (Advanced) and click Next.
- Click Don't search. I will choose the driver to install and click Next.
- On the next screen, you are presented a list of two or more VMWARE SVGA II Versions to choose from. For example:
VMWARE SVGA II Version: 11.6.0.31 (21/09/2009)
VMWARE SVGA II Version: 11.6.0.32 (24/09/2009)
VMWARE SVGA II Version: 11.6.0.34 (01/03/2010)
Choose VMWARE SVGA II Version: 11.6.0.32 (24/09/2009). - Click Next. The driver begins installing.
- Click Continue Anyway when Windows notifies you that VMware SVGA II has not passed Windows logo testing.
The driver install completes. - Click Finish.
- Click YES when prompted to restart your computer.
- Verify that PCoIP is now working.
Note: VMware is investigating a permanent fix for the issue so our customers can upgrade to ESX 4.0 Update 2 without experiencing this issue.
We will update this article with more information as it becomes available.
Update History
PCoIP protocol is recommended for dual monitors. If using RDP protocol please refer to this article.
VMware suggests to change the default video driver in the VM from "VMware SVGA 3D (Microsoft Corporation - DDM)" to the VMware driver from "c:\program files\common files\vmware\drivers\video"
The duplicate printer appears because RDP printer redirection is enabled while USB redirection is enabled in the Virtual Desktop Manager Client.
RDP presents the printer through the printer redirection feature at the same time the USB device is presented by Virtual Desktop Manager to the virtual desktop.
To correct this issue, disable RDP printer redirection using either a registry key or a policy:
- Modify the following registry key:
HKCU\Software\VMware, Inc.\VMware VDM\Client\RDP Settings\RedirectPrinters
Set the value to false
In the Device Manager, if you find that the video driver is listed as VMware SVGA 3D, you have to update it to VMware SVGA II. You can find the driver in C:\Program Files\Common Files\VMware\Drivers\video.
VMware View 5 is designed for security and by default requires a secure https connection using a preinstalled certificate.
If you are not using an https or secure connection to your VMware View Server then follow these steps.
- When creating the connection on your 10ZiG thin client, choose the Advanced Tab and uncheck the Disconnect from server on logoff.
- Now connect as normal to your VMware View Server as normal but you will now notice this prompt alerting that the Server is unsecure. On the initial set up of the connection.
- Now click on File, Preferences
- In the Preferences window change the Default connection type to ALLOW…(Not Secure) and click OK.
- Now click on File, Quit
- Choose your connection and click Connect and proceed to log on as normal and select your desktop.
VMware View Connection Server now requires an SSL certificate that is signed by a CA (certificate authority) and that your clients can validate. To improve the security of VMware View deployments, VMware is deprecating support for View Client authentication and brokering over a non-secured HTTP connection. In the past, you could use the default self-signed certificate that is generated in the absence of a CA-signed certificate. With View 5.1, you must replace the default self-signed certificate as soon as possible. Self-signed certificates are shown as invalid in View Administrator.
Linux is different than Windows in that you must manually install the certificate from a USB thumb drive or via the Manager (template will also carry the certificate once it is installed)
Go into Settings - Security and check Enable Installation from USB Storage
Copy the certificates in .crt or .pem format including the root and intermediate and server certificate onto the USB thumb drive. Place the thumb drive in the thin client. Once the thin client detects the USB thumb drive and sees the certificates it will present the following menu:
Once the certificates are uploaded you can see them by taking the option for settings as seen below:
Select the certificates ICON
From the certificate option you can view the imported certificates and highlight then select Show for certificate details.
Change to view source of Base Certificates which have been preinstalled. Many of the common certificates are installed but if the required base certificate is one that has not been installed it must be installed using the USB method.
Time to change the way we think! VMview no longer supports Webcams as USB devices! From VMware 2.2 they now use Real Time Audio Visual drivers RTAV (VMware's Remote Experience package must be installed on the desktop).
Since Linux still sees the device natively changes must be made in the USB redirection on the thin client. From the control panel/settings select USB Redirection and find the webcam and set it to be EXCLUDED as a USB Device.
The camera will work just fine for Skype, websites or any program/page that is looking for a webcam device. Please NOTE that the downloaded programs that come with the drivers for the cameras such as Logitech and Microsoft packages query the USB for the camera, so they do not work! You can test the webcam using www.test-my-cam.com
In desktop mode, edit the 5250 session and go to the advanced tab. Under Miscellaneous change the Acoustic messages to Wave Device and select the desired Wav.
Starting at version 8.1.19 for the 5500 units and 11.13.38 for the 5700 and 5766 units set the session up as seen below in the advanced section of the connection tab.
Press CTRL+ALT+ESC to start the screen saver and then press the spacebar to unlock .
Click HERE for instructions/information for the new custom screensaver setting in PeakOS™.
Download the Imprivata Compatibility Guide and Integration Guide.
As of January 2018, 10ZiG Technology is aware of the recent outbreak surrounding Spectre and Meltdown. 10ZiG Technology is working with their upstream suppliers to confirm which models are affected, in addition to patching levels available for the appropriate models. Further information on this topic will be posted as made available and can be requested by contacting 10ZiG Technical Support.
support@10zig.com 866-864-5250 ext. 1 / support@10zig.eu +44 (0) 116-2148650
Go to Control Panel / VMware Horizon / Login, then enable the ‘Hide Domain Field’ option.
- The V1200-POE and 5900q series including PoE module falls into PoE class 4 (12.96W-25.5W). Although typical usage of the clients is significantly less (i.e. 5-7 watts), you should allow for 23W per client. This is due to initial power requirements, specifically where multiple monitors are attached and the client initializes and performs boot up.
An explanation of the Cloning/Deploying and Backup/Restore and their differences:
- Cloning is the process of creating a deployable Windows image.
- The administrator initiates the clone from the Manager’s Thin Client view after selecting the source device.
- For a WE10 device, the administrator is guided through a Sysprep wizard for additional customization.
- The administrator is prompted for the name to which to save the image.
- The source is set to PXE boot, and the Manager remotely initiates “Sysprep
PCoIP Zero Client and Amazon WorkSpaces
Please see the document below:
90001200/TER1408002_Issue_1-Connecting_PCoIP_Zero_Clients_to_Amazon_WorkSpaces.pdf.pdf
Make certain you add the printers in the GCP on the printer server and then share the printers with other users.
Currently AWS does not support USB devices (other than keyboard and mouse) on Zero Clients.
http://docs.aws.amazon.com/workspaces/latest/adminguide/client_help.html (excerpt regarding USB is below.)
Most keyboards and pointing devices are supported by the Amazon WorkSpaces client applications. This includes many different types of USB and Bluetooth input devices. If you encounter an issue with a particular device, report the problem at https://console.aws.amazon.com/support/home#/. Other locally attached peripherals, such as storage devices, are not supported.
Please refer to the Amazon documentation for future updates on USB and printer redirection.
Tera2/V1200/V1206/AIO
First step is to disable single signon... by adding a string entry "AllowSingleSignon" with a value of "false" to HKEY_LOCAL_MACHINE\SOFTWARE\VMware, Inc.\VMware VDM\Agent\Configuration on the VM that you want to assign a specific client.
This is done using regedit, or with a GPO. This can be done either on the source for a pool, an individual machine in a pool (but it will be overwritten with a recompose), or for a single non-linked clone vm in a pool. Create a AD user, depending on your client device's autologin requirements for the username naming convention, and then assign that user to that VM.
When the device logs in, it will get its assigned VM based on the username.(Make sure you only assign that user to a single pool/vm). Since single sign on has been disabled, it does not pass the view credentials to the VM... requiring the user to log in.
Then on the V1200 change the connection type to View Connection Server + Auto-logon
You will need an AD account that has rights to that desktop and also enter the pool name to select. The pool I used only has one desktop in it so this V1200 always connects to that desktop only.
PCoIP zero clients support Display Port protocol version 1.1a.
If a device is certified as Display Port 1.2 then it should be backward compatible to Display Port 1.1, the key word in this statement is should. There are monitors that claim to be Display Port 1.2 certified however they are not backward compatible.
The newer units do prompt for a password but the default is no password. Just click on through it and you can then add a password if you so choose.
Please contact 10ZiG Support at support@10zig.com or 866-864-5250 x0 for information on downloading firmware.
Click here to download the Tera2 administrators's guide.
Yes, but to use WOL on a zero client you would need 3rd party software, listed below are some sites for WOL utilities.
Note: 3rd party wake-on-LAN utility software is required to generate WOL packets to send to PCoIP zero clients. Here are some examples WOL utility tools.
Note: Teradici or 10ZiG has not tested these tools and is providing this list for reference only.
- http://download.cnet.com/Wake-On-LAN/3000-2085_4-10486163.html
- http://emcosoftware.com/wake-on-lan
- http://www.wakeonlan.me/
- http://www.depicus.com/wake-on-lan/wake-on-lan-gui.aspx
Regarding the Management Console, you can use it or the zero client Web UI (AWI) to enable the WOL feature.
For quad monitor to work the Virtual Machine must have enough VRAM to support all four monitors. Make certain that the pool is set for four (4) monitors and the resolution is set at the highest setting. Changing these two parameters will adjust the VRAM high enough to support the four monitors.
Teradici PCoIP zero clients and host cards do not support VLAN tagging. If an environment requires VLAN tagging, the implementation of a network device's (switch / router) VLAN options such as port based VLANs or VLAN tagging is recommended.
The driver comes as a component within the PCoIP Component Installer. The Teradici's virtual audio driver provides bi-directional analog and locally terminated USB audio support for virtual desktops using PCoIP Software such as VMware Horizon.
These devices may need to be bridged to the host rather than being locally terminated please see the document below for inforomation on how to bridge a USB device on a PCoIP zero client.
Check settings in MSCONFIG - Boot - Base video must be unchecked.
Yes.
PCoIP zero clients support pre-session smart card authentication for sessions connected to VMware View virtual desktops that meet the system configuration
requirements listed next. For deployments that meet these requirements, PCoIP zero clients can also read and process smart card information and allows SSO (single
sign on) authentication of the user prior to session establishment.
Please click here to read the Teradici document regarding support for pre-session smart card authentication.
Please click here to read the Teradici document Imprivata Onesign PCoIP zero clients deployment guide ter1204004_1.pdf.
To remove the user's capability of changing the View Connection Server(VCS) address on the Zero Client's(ZC) OSD, please follow the instructions below.
Management Console 1.10.x
Using the Teradici Manage Console.
- Go to the profile that manages the ZCs you want to change.
- In the profile go to "Session Configuration"and click the "Edit Properties" link.
- Check the box for "Session Connection Type" and select "View Connection Server" in the drop down list.
- Check the box for "View Connection Server Address" and enter in the URL for the VCS.
- Check the box for "Connection Server Cache Mode" and in the drop down list select "Read Only"
- Scroll to the bottom and click the "Save" button.
- Apply the profile.
Management Console 2.x
- Go to the profile that manages the Zero Clients you want to change.
- Click on the Session tab in the left hand pane.
- Change your Session from Basic to Advance
- Set your Session Connection Type to View Connection Server
- Set your Server URI
- Scroll down and set your Connection Server Cache Mode to Read Only from the drop down.
- Scroll back to the top and click save then apply your profile.
RTAV is not supported on PCoIP Zero Clients
Mounting instructions can be found HERE.
- The V1200-POE and 5900q series including PoE module falls into PoE class 4 (12.96W-25.5W). Although typical usage of the clients is significantly less (i.e. 5-7 watts), you should allow for 23W per client. This is due to initial power requirements, specifically where multiple monitors are attached and the client initializes and performs boot up.
10ZiG Manager
Please email support@10zig.com (US) or support@10zig.eu (EU) for the latest 10ZiG Manager download.
Click here to download the 10ZiG Manager Cloud Connector Set Guide.
Note: Do not use a Sandisk USB. Sandisk USB drives are recognized as a basic drive rather than a USB (removable) and the program will not be able to see them.
Download the Drive Imaging Utility and Guide below:
On the 10ZiG Manager Server PC, open regedit and navigate to Computer\HKEY_LOCAL_MACHINE\SOFTWARE\WOW6432Node\10ZiG\MgrService. Create a new Reg DWORD value under MgrService key, with Name ‘AlwaysRetrieveBeforeTemplate’ and Value Data ‘1’. Restart the 10ZiG Manager Service to apply change.
A Service (SRV) record is a Domain Name System (DNS) resource record that is used to identify computers that host specific services. Clients query for a specific service/protocol name within a specific domain to receive the associated server hostname and port number.
SRV records are added to the "Forward Lookup Zone" for the DNS domain with the name formatted as "_servicename._protocol.domain" e.g. "_tzmgr_discovery._udp.example.com"
With the 10ZiG Manager, our Linux v9 (9.9.x or later) and Windows (XTC Agent 2.0.1.3 or later) devices can query for the manager server location and automatically initiate registration.
The manager now has the capability to automatically register an SRV record with a local Microsoft DNS server, assuming the user has the appropriate privileges. However, if the automatic SRV record creation fails, use the following instructions to manually add the record.
A DNS Service Location record can be created to provide the host name of the computer and port on which the 10ZiG Manager server is located allowing thin clients to “check-in
Open a bash shell using CTRL + ALT + SHIFT + 0 (Do Not Use Numeric Keypad). Type ‘host -t SRV _tzmgr_discovery._udp.yourdomain.local’ - Where ‘yourdomain.local’ is the domain suffix assigned to the client via DHCP.
Open a bash shell using CTRL + ALT + SHIFT + 0 (Do Not Use Numeric Keypad). Type ‘host -t SRV _tzmgr_discovery._tcp.yourdomain.local’ - Where ‘yourdomain.local’ is the domain suffix assigned to the client via DHCP.
The 10ZiG Manager communicates with the various thin clients on several network ports that will conflict with existing DHCP or Active Directory functionality; therefore, it is recommended that the Manager not be installed on computers that already host these services such as domain controllers.
Following are the associated ports for the 10ZiG Manager:
- Network Ports and Purpose
- TCP 3306 - Used by the local MySQL service hosting the Manager database.
- TCP 11132 - The Manager Console retrieves information from the Server via this port.
- TCP 11133-11147 - A Manager Console will register one of the ports in this range, usually 11133, with the Server to receive various notifications.
- TCP 445 - Used in the PXELinux image for authentication to the ImageStore share.
- Client Discovery and Communication Ports
- UDP/TCP 52500 - Broadcast discovery port for Windows (XTC Agent) and Linux 9 thin clients.
- TCP 52510 - This RPC port is used by Manager Server to perform remote operations and queries on Windows (XTC Agent) clients.
- TCP 52511 - This RPC port is used Windows (XTC Agent) clients to notify the manager server when they come online or are going offline.
- TCP 80/443 (HTTP/HTTPS) -These Web ports are used by Manager Server to query information from and perform operations on Linux 9 (LTC Agent) clients.
- UDP 1680 or TCP 1680 - Depending on whether TCP discovery is enabled, one of these ports is used to discover of Linux 8 and Windows CE thin clients.
- TCP 21(FTP) - The port is used by Manager Server to query information from and perform operations on Linux 8 (Browsed Agent) clients.
- TCP 8001 - The Manager Server publishes firmware update packages for Linux clients on this port.
- Template Port - Linux
- WEBDAV on port 80 for standard connections or a websocket tunnel on client initiated webtunnel in the case of "cloud connected" (default cc port would be 443).
- PXE Boot Ports
- UDP 67 (DHCP/BOOTP)- The Manager Server responds to DHCP/BOOTP requests from this port for PXE-Booting clients for image deployment/recovery.
- UDP 68 (DHCP/BOOTP)- The client listens for responses to DHCP/BOOTP requests from manager server for image deployment/recovery.
- UDP 69 (TFTP) - When PXE-Booting, the PXE configuration and boot image are transferred to the client via TFTP
- Syslog Port
- UDP 51
Cloud Connector Ports
- 443 - or whatever port you assigned the CC.
Tip: If you are unable to PXE boot from your 10ZiG Manager, run a command prompt and type in netstat -abp udp to find out what services are bound to your ports.
A working example should look like this
UDP(DHCP/BOOTP) 0.0.0.0:67
[MgrService.exe]
UDP(TFTP) 0.0.0.0:69
[MgrService.exe]
No, always create a new template from the updated firmware. Often times parameters may have changed in the new firmware that could become corrupt by applying an older template.
Make certain the Image Store path is set in the 10ZiG Manager setup
Copy the image file (.tar) to the image store folder.
If the thin client is on the network the 10ZiG Manager service is running it will displayed in the 10ZiG Manager console.
Right click on the thin client to be updated and select Firmware update.
Select Install if you do not see the firmware you are looking to use to update the firmware. Highlight the firmware to install and select open. This process extracts the .tar into the 10ZiG Manager htdocs folder.
Once the package has been extracted, the firmware will be display as below:
Highlight the package and select Apply.
Select OK to continue with the firmware update.
The update will show in the notification area at the bottom of the console.
Once the firmware update is complete, the thin client will reboot. The 10ZiG Manager will now show the updated firmware.
1. Right click on the 10ZiG Manager ICON in the notification area (lower right) and select Settings.
2. Go to the server tab and then Advanced on the left side and change the logging level at the bottom to debug and save settings. The manager should prompt you to you restart but if it does not, restart manually after this change.
3. From the Windows Application Menu, select 10ZiG Syslog.
4. Double click on the log ICON in the notification tray.
5. Then click on View Log
5. The image below is the log view. If you have email set up on this server/PC you can take the option to email the log file. Support techs will direct you where to send it.
6. You can also grab the log file directly and attach it to an email to send to 10ZiG support. The path to the file is at the bottom of the image above.
An explanation of the Cloning/Deploying and Backup/Restore and their differences:
- Cloning is the process of creating a deployable Windows image.
- The administrator initiates the clone from the Manager’s Thin Client view after selecting the source device.
- For a WE10 device, the administrator is guided through a Sysprep wizard for additional customization.
- The administrator is prompted for the name to which to save the image.
- The source is set to PXE boot, and the Manager remotely initiates “Sysprep
The 10ZiG Manager uses UltraVNC viewer for shadowing thin clients. This viewer provides various additional features like chat and file transfer. These features can be accessed via hot key sequences that begin with “Ctrl+Alt
Within the DHCP scope of each remote network segment, define the “Boot Server Host Name
The 10ZiG Manager HELP is the full manual.
No, PXE is part of BIOS and the BIOS only knows about the built in NIC.
No, the 10ZiG Manager communicates with the thin clients using remote procedure call (RPC) and Active Directory relies on remote procedure call (RPC) for replication between domain controllers thus resulting in a conflict if on the same server.
To update if your image is lower than 9.9.4 you must update using a binary image. Contact Tech Support for location and credentials to download updated image.
There are two are options - restore the binary image using the 10ZiG Manager (https://www.10zig.com/manager) or use a thumb drive created by TzImgUtil (See Question 3 under 10ZiG Manager to download the USB Image Utility).
Update using 10ZiG Manager
- Install the 10ZiG Manager and copy the binary file to 10ZiG Manager\ImageStore (created when you install the 10ZiG Manager)
- If the thin client is seen in the 10ZiG Manager, right click on it, select Image Management and then Backup and Restore
- Change the BIOS settings of the thin client to boot from LAN (BIOS password is 10ZIG)
- Boot the thin client and it will PXE boot to the 10ZiG Manager
- When the thin client has booted it will be displaying a recovery menu on the display but do not use that menu, rather use the Image recovery tab. Right click on the thin client to be reimaged (it should now indicate PXE YES with a green dot) and select Restore Binary Image>
- Select the image file to be restored
- The 10ZiG Manager will restore the image and indicate a successful restore when complete
- Right click on the thin client and deselect the PXE boot option
- Reboot the thin client which now has the updated image
The thin client will be moved to the Image recovery tab with PXE set to Yes
If the thin client is not seen by the 10ZiG Manager, click on the Image recover tab and add the MAC address of the thin client using the Add MAC ICON
Update using a USB Thumb Drive
- Download the image utility from our FAQ pages (See Question 3 under 10ZiG Manager to download the USB Image Utility and documentation).
- Extract the utility and run the program to make a USB thumb drive bootable for the utility
- Make certain you format as fat32 and the USB thumb drive needs to be large enough to hold the boot files and the binary fileNote: This program will erase all files on the thumb drive
- Enter the BIOS of the thin client (password 10ZIG) and set the first boot to USB (on some units the option may be USB Zip)
- Boot the thin client using the created USB thumb drive
- Use the menu on the display to restore the image
- Once complete reboot with thumb drive removed to an updated image
WOL uses UDP port 9 and sends a small broadcast to wake up the thin client. For WOL to work the network environment must support “direct broadcasting
Most likely the name of the thin client has been changed to a name with a space in it - remove the space and it will show up in the manager with the correct name.
- Copy all the files from the tftp folder from the 10ZiG Manager install folder to the existing PXE server in the published files directory.
- Place the image in the general repository directory on the existing PXE server.
- Go into the manager server settings (right click on the ICON down near the time on your PC and select settings) - Advanced Tab – Uncheck Enable TFTP server and under the TFTP Host put the IP of the existing PXE server. Boot the thin client in PXE mode and you should be able to restore the image from the existing PXE server.
The database lock is most likely an issue with the anti-virus software installed on the PC - exclude the 10ZiG Manager and MYSQL programs in the anti-virus program and the 10ZiG Manager should pick the thin clients.
Network address translation (NAT) is the process of modifying IP address information in IP packet headers while in transit across a traffic routing device. The 10ZiG Manager uses TCP and UDP ports on the network to communicate with the thin clients and using NAT would not work. If you use the cloud connector you will not need to NAT.
Check to see if the .tar file was renamed when it was downloaded. The 10ZiG Manager looks for a specific naming convention when it starts the firmware option, if that naming convention does not match up to what it requires it will fail. If this is the case, rename the file back to the original name and try the firmware update again.
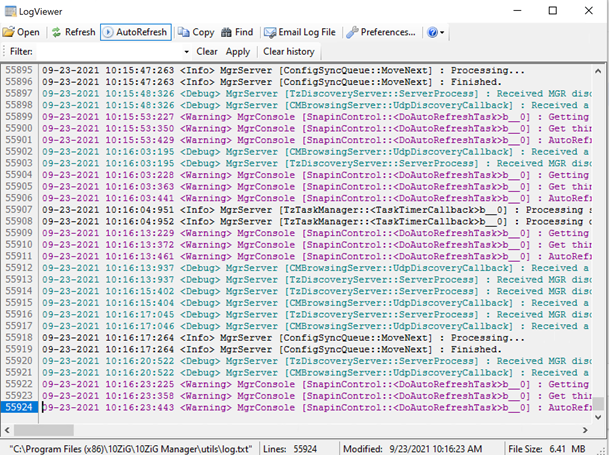
If the Syslog has messages similar to the ones below, the database is corrupt.
11-07-12 12:53:13:881 10ZiG Syslog Server started.
11-07-2012 12:53:14:006 <Error> MgrServer [DBConnection::ExecuteReader] : Command: 'SELECT t1.*, t2.name FROM client AS t1 LEFT JOIN locks AS t2 ON t1.id = t2.name WHERE t1.id = '8000E0C545EC2C00'' Failed : (OdbcException) ERROR [HY000] [MySQL][ODBC 3.51 Driver][mysqld-5.0.67-community]Table '.\tenzigmgr\client' is marked as crashed and should be repaired
11-07-2012 12:53:14:006 <Error> MgrServer [DAOThinClient::Get] : System.NullReferenceException: Object reference not set to an instance of an object.
at Tenzig.Manager.Server.Data.DAOThinClient.Get(String id)
11-07-2012 12:53:14:975 <Error> MgrServer [DBConnection::ExecuteScalar] : Command: 'SELECT COUNT(*) FROM client WHERE id = '8000E0C545F0FC00'' Failed : (OdbcException) ERROR [HY000] [MySQL][ODBC 3.51 Driver][mysqld-5.0.67-community]Table '.\tenzigmgr\client' is marked as crashed and should be repaired
11-07-2012 12:53:14:975 <Error> MgrServer [DBConnection::ExecuteNonQuery] : Command: 'INSERT INTO client (id, platform, authorized, mac, wlan, lastip, name, type, vers, hw, ewf, domain_membership, domain_name, info, agent, time_stamp) VALUES(?, ?, ?, ?, ?, ?, ?, ?, ?, ?, ?, ?, ?, ?, ?, ?)' Failed : (OdbcException) ERROR [HY000] [MySQL][ODBC 3.51 Driver][mysqld-5.0.67-community]Table '.\tenzigmgr\client' is marked as crashed and should be repaired
11-07-2012 12:53:14:990 <Error> MgrServer [DBConnection::ExecuteReader] : Command: 'SELECT t1.*, t2.name FROM client AS t1 LEFT JOIN locks AS t2 ON t1.id = t2.name WHERE t1.id = '8000E0C545F0FC00'' Failed : (OdbcException) ERROR [HY000] [MySQL][ODBC 3.51 Driver][mysqld-5.0.67-community]Table '.\tenzigmgr\client' is marked as crashed and should be repaired
11-07-2012 12:53:14:990 <Error> MgrServer [DAOThinClient::Get] : System.NullReferenceException: Object reference not set to an instance of an object.
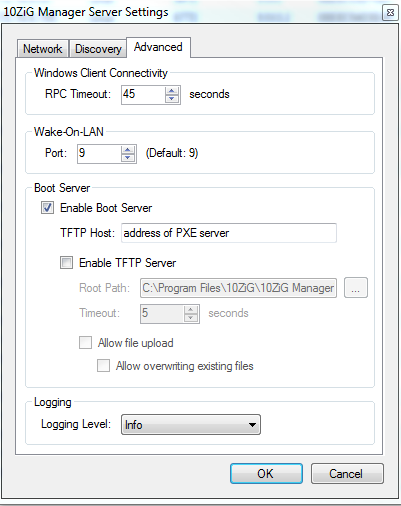
To repair perform the following:
- Shutdown the Manager service and make certain the “TzMySQL
The sysprep settings are stored within the database. However, if you need to remove previously saved settings:
- Choose the desired configuration from selection panel of the “Clone System Image
VMware Horizon - Linux Thin Client
Upgrading VMware Tools in a virtual desktop causes PCoIP connections to fail
Symptoms
- Connections to virtual desktops using PCoIP fail
- You are no longer able to connect to virtual desktops using PCoIP
- You have recently updated VMware Tools
For example, you have installed ESX 4.0 Update 2, which updates VMware Tools, and you are no longer able to connect to virtual desktops using PCoIP
Resolution
Prevention
To avoid this issue, do not upgrade to ESX 4.0 Update 2 if you are using View 4.x with PCoIP.
OR
You can install VMware Tools for ESX 4.0 Update 2 without the SVGA driver.
To install without the SVGA driver, after upgrading you VMware Tools package on ESX host, from vSphere Client:
- Right-click on the guest, and click Guest > Install/Upgrade VMware Tools.
- Ensure Automatic Tools Upgrade is selected
- Copy and paste the following text as it applies to your environment into Advanced Options:
Note: Do note include line breaks when you copy the text. The line breaks are for formatting purposes only.
For x86 guests:
/s /v "/qn REINSTALLMODE=voums REINSTALL=WYSE,VMXNet,VMCI,Mouse,MemCtl,Hgfs,VSS,VMXNet3,vmdesched,ThinPrint,Sync,
PVSCSI,Debug,BootCamp,Audio,Buslogic,VICFSDK,VAssertSDK,Toolbox,Upgrader,GuestSDK,
PerfMon,Common,microsoft_dlls_x86,ArchSpecific"
For x64 guests:
/s /v "/qn REINSTALLMODE=voums REINSTALL=WYSE,VMXNet,VMCI,Mouse,MemCtl,Hgfs,VSS,VMXNet3,vmdesched,ThinPrint,Sync,
PVSCSI,Debug,BootCamp,Audio,Buslogic,VICFSDK,VAssertSDK,Toolbox,Upgrader,
GuestSDK,PerfMon,Common,microsoft_dlls_x64,ArchSpecific" - Click OK. VMware Tools automatically upgrades in the guest, and the guest reboots.
Workaround
For customers that do not have a requirement to use PCoIP, you can use RDP. For more information on using RDP, see the VMware View Administration Guide.
For customers that are experiencing the issue and want to continue using PCoIP, use this workaround:
Note: VMware recommends that you have VMware View 4.0.1 installed prior to performing these steps.
- Log in to the affected virtual machine(s) with Administrator rights. This is any virtual machine that has the VMware Tools shipped with ESX 4.0 Update 2 installed.
- Rename the C:\Program File\Common Files\VMware\Drivers\Video folder to C:\Program File\Common Files\VMware\Drivers\Video-OLD.
- From a working virtual machine, copy the C:\Program File\Common Files\Vmware\Drivers\Video folder to C:\Program File\Common Files\Vmware\Drivers\ on an affected virtual machine.
- Click Start > Settings > Control Panel > System.
- Click the Hardware tab and click Device Manager.
- Expand Display Adapters.
- Choose VMWARE SVGA II. Right-click on it and choose Properties.
- Click the Driver tab. You are presented with the SVGA driver properties.
The version is 11.6.0.34 (Driver Date 01/03/2010). - Click Update Driver. The Hardware Update wizard displays.
- When prompted with the question, "Can windows connect to Windows Update to search for software?", click No, not at this time and click Next.
- When prompted with the question, "What do you want the wizard to do", click Install from a list or specific location (Advanced) and click Next.
- Click Don't search. I will choose the driver to install and click Next.
- On the next screen, you are presented a list of two or more VMWARE SVGA II Versions to choose from. For example:
VMWARE SVGA II Version: 11.6.0.31 (21/09/2009)
VMWARE SVGA II Version: 11.6.0.32 (24/09/2009)
VMWARE SVGA II Version: 11.6.0.34 (01/03/2010)
Choose VMWARE SVGA II Version: 11.6.0.32 (24/09/2009). - Click Next. The driver begins installing.
- Click Continue Anyway when Windows notifies you that VMware SVGA II has not passed Windows logo testing.
The driver install completes. - Click Finish.
- Click YES when prompted to restart your computer.
- Verify that PCoIP is now working.
Note: VMware is investigating a permanent fix for the issue so our customers can upgrade to ESX 4.0 Update 2 without experiencing this issue.
We will update this article with more information as it becomes available.
Update History
The 10ZiG 6100 series supports this resolution. At this time other models are not supported.
PCoIP protocol is recommended for dual monitors. If using RDP protocol please refer to this article.
VMware suggests to change the default video driver in the VM from "VMware SVGA 3D (Microsoft Corporation - DDM)" to the VMware driver from "c:\program files\common files\vmware\drivers\video"
The duplicate printer appears because RDP printer redirection is enabled while USB redirection is enabled in the Virtual Desktop Manager Client.
RDP presents the printer through the printer redirection feature at the same time the USB device is presented by Virtual Desktop Manager to the virtual desktop.
To correct this issue, disable RDP printer redirection using either a registry key or a policy:
- Modify the following registry key:
HKCU\Software\VMware, Inc.\VMware VDM\Client\RDP Settings\RedirectPrinters
Set the value to false
In the Device Manager, if you find that the video driver is listed as VMware SVGA 3D, you have to update it to VMware SVGA II. You can find the driver in C:\Program Files\Common Files\VMware\Drivers\video.
VMware View 5 is designed for security and by default requires a secure https connection using a preinstalled certificate.
If you are not using an https or secure connection to your VMware View Server then follow these steps.
- When creating the connection on your 10ZiG thin client, choose the Advanced Tab and uncheck the Disconnect from server on logoff.
- Now connect as normal to your VMware View Server as normal but you will now notice this prompt alerting that the Server is unsecure. On the initial set up of the connection.
- Now click on File, Preferences
- In the Preferences window change the Default connection type to ALLOW…(Not Secure) and click OK.
- Now click on File, Quit
- Choose your connection and click Connect and proceed to log on as normal and select your desktop.
VMware View Connection Server now requires an SSL certificate that is signed by a CA (certificate authority) and that your clients can validate. To improve the security of VMware View deployments, VMware is deprecating support for View Client authentication and brokering over a non-secured HTTP connection. In the past, you could use the default self-signed certificate that is generated in the absence of a CA-signed certificate. With View 5.1, you must replace the default self-signed certificate as soon as possible. Self-signed certificates are shown as invalid in View Administrator.
Linux is different than Windows in that you must manually install the certificate from a USB thumb drive or via the Manager (template will also carry the certificate once it is installed)
Go into Settings - Security and check Enable Installation from USB Storage
Copy the certificates in .crt or .pem format including the root and intermediate and server certificate onto the USB thumb drive. Place the thumb drive in the thin client. Once the thin client detects the USB thumb drive and sees the certificates it will present the following menu:
Once the certificates are uploaded you can see them by taking the option for settings as seen below:
Select the certificates ICON
From the certificate option you can view the imported certificates and highlight then select Show for certificate details.
Change to view source of Base Certificates which have been preinstalled. Many of the common certificates are installed but if the required base certificate is one that has not been installed it must be installed using the USB method.
Time to change the way we think! VMview no longer supports Webcams as USB devices! From VMware 2.2 they now use Real Time Audio Visual drivers RTAV (VMware's Remote Experience package must be installed on the desktop).
Since Linux still sees the device natively changes must be made in the USB redirection on the thin client. From the control panel/settings select USB Redirection and find the webcam and set it to be EXCLUDED as a USB Device.
The camera will work just fine for Skype, websites or any program/page that is looking for a webcam device. Please NOTE that the downloaded programs that come with the drivers for the cameras such as Logitech and Microsoft packages query the USB for the camera, so they do not work! You can test the webcam using www.test-my-cam.com
As of January 2018, 10ZiG Technology is aware of the recent outbreak surrounding Spectre and Meltdown. 10ZiG Technology is working with their upstream suppliers to confirm which models are affected, in addition to patching levels available for the appropriate models. Further information on this topic will be posted as made available and can be requested by contacting 10ZiG Technical Support.
support@10zig.com 866-864-5250 ext. 1 / support@10zig.eu +44 (0) 116-2148650
10ZiG Windows Embedded 10
Please find the EULA at 10ZiG EULA
The 10ZiG 6100 series supports this resolution. At this time other models are not supported.
UWF is Unified Write Filter - please see documents below for more information.
Unified Configuration Tool Walkthrough_LH.PDF
As of January 2018, 10ZiG Technology is aware of the recent outbreak surrounding Spectre and Meltdown. 10ZiG Technology is working with their upstream suppliers to confirm which models are affected, in addition to patching levels available for the appropriate models. Further information on this topic will be posted as made available and can be requested by contacting 10ZiG Technical Support.
support@10zig.com 866-864-5250 ext. 1 / support@10zig.eu +44 (0) 116-2148650
Log in as administrator and disable the Windows Update service.
Add the following registry key to your 10ZiG Windows 10 IoT Client:
[HKEY_LOCAL_MACHINE\SOFTWARE\Policies\Citrix\ICA Client\Graphics Engine]
"EnableH265"=dword:00000001
Assign the reg file containing necessary changes in the update file field and for command line parameters be sure to include the /reg:64 parameter as per following example ‘REG IMPORT
10ZiG Windows Embedded 7
Windows Aero is the graphical user interface and the default theme in most editions of Windows Vista and Windows 7 operating systems released by Microsoft. This user interface is very resource intensive, change the desktop theme to the 10ZiG Technology theme which does not use Windows Aero. Right click on the desktop and go to personalize - set the theme to 10ZiG Technology.
Uncheck all options in the RDP experience tab.
When using dual monitor (VGA and DVI) you will need to change the desktop theme to a non Aero Theme.
PCoIP protocol is recommended for dual monitors. If using RDP protocol please refer to this article.
Run sysprep on Windows 7 as follows:
At the c:\windows\system32\sysprep prompt
sysprep /generalize /unattend:c:\xml file location /shutdown
Example for E710 model US: sysprep /generalize /unattend:c:\setup\cloneus.xml /shutdown
Example for E710 model UK: sysprep /generalize /unattend:c:\setup\cloneuk.xml /shutdown
Example for all other models US: sysprep /generalize /unattend:c:\setup\us.xml /shutdown
Example for all other models UK: sysprep /generalize /unattend:c:\setup\uk.xml /shutdown
Below are two xml files that can be used for this process:
Click here to download the Gemalto Driver
Input - Gemalto Minidriver for .NET Smart Card
The normal Gemalto card reader work fine with no driver
Enter the BIOS and change the shared RAM from 64 to 256
This temp profile issue can cause missing ICONS on the desktop and loss of Windows 7 customized settings. Restarting or logging off and back on to Windows 7 does not resolve the issue. This temp profile issue rises because of a registry key problem.
To fix the Temporary Profile in Windows 7 Issue follow the steps below:
- Log in with temp profile.
- Start registry editor by typing regedit in find box in Windows 7.
- Navigate the following location in Windows 7.
- You will see similar keys under profile list with .bak difference, as shown below.
- The correct profile key is marked as bak. Currently your Windows 7 computer logged in with fresh profile with same key. So, rename the new profile key ( without extension .bak) and remove .bak from correct profile key. See below.
- Log off and back on with user name and password. You should get your icons and profile settings back in Windows 7.
By default the 10ZiG Win 7 thin clients come with the RemoteFX USB redirection feature enabled.
To turn off RemoteFX redirection, the RemoteFX USB redirection feature must be disabled.
Select Start - Run - gpedit.msc and select OK. In Group Policy, navigate to Computer Configuration\Administrative Templates\Windows Components\Remote Desktop Services\Remote Desktop Connection Client\RemoteFX USB Device Redirection, and edit “Allow RDP redirection of other supported RemoteFX USB devices from this computer.
By default the 10ZiG Win 7 clients are shipped with optimize visual experience set to medium.
To configure the experience index for connections when using RemoteFX:
- Log on to the thin client as a member of the local Administrators group
- Click Start, and in the Search programs and files box, type gpedit.msc, and then press ENTER
- Navigate to Computer Configuration\Policies\Administrative Templates\Windows Components\Remote Desktop Services\Remote Desktop Session Host\Remote Session Environment
- Double-click Optimize visual experience when using RemoteFX
- In the Screen capture rate (frames per second) box, click Highest (best quality), and then click OK.
- In the Screen Image quality box, click Highest (best quality), and then click OK
- Restart the thin client
Yes it will work. The problem that still exists is that when you do a warm boot (restart) the fourth monitor does not come up, however if you power down completely and then do a cold boot or a normal power up the fourth monitor will initialize.
Technically you can but keep in mind:
Verify there is enough space on the the DOM to install the updates.
Either disable write protection or make sure you commit changes after updates have taken place or once it reboots they will be gone.
Below is a zip file containting the hotfixes from Citrix
The fix needs to applied to the Xenserver VM that XenDesktop is handing out, it does NOT go on the thin client. Import the .reg file into the VMs registry and the 2 files go here:
C:\Program Files\Citrix\ICAService\PseudoServerInproc.dll
C:\Program Files\Citrix\ICAService\CtxFlashSvc.dll
There are a couple of issues with Touch Screens in WES 7
If the touch screen requires a driver and does not take advantage of the native dll’s in Windows 7’s tablet pc support then it will work.
For example the DT Tablet 312 & 362 use the Penmount driver which works in WES 7.
If the touch screen does not require a driver, it will not work in our build of WES 7 even if the touch screen works in Windows 7. There is a component called Tablet PC support in Windows 7 and one of its functions is to provide touch screen support. This component cannot be put into the 10ZiG Technology WES 7 image because it requires a higher license.
ELO Touch Screens will not work in 10ZiG Technology WES 7 builds. We are checking with ELO to see if all models require this component and if they do, ELO will only work in XPe. Once we have a better understanding as to which Touch Screens will work with WES 7 we will provide a list of recommended touch screens.
Press CTRL+ALT+DEL - take the option to LOGOFF. While logging off hold the right shift key and continually tap the left shift key until you are presented with a logon box. Log on as administrator.
The reason why this occurs is that domain and PC exchange a secret key behind the scenes and the default time limit on this exchange is 30 days. When EWF is enabled and the PC gets rebooted and the change that has occurred is not saved in the registry. The work around for this is:
- Start|Run
- Type regedit
- Go to key
[HKEY_LOCAL_MACHINE\SYSTEM\CurrentControlSet\Services\Netlogon\parameters] - Locate parameter on right side
- Disablepasswordchange it is set to 0
- Change it to a 1
- Save changes
Disable the following services
- IIS – Microsoft’s Internet Information Services provide the capabilities of a Webserver for your computer.
- NetMeeting Remote Desktop Sharing — NetMeeting is primarily a VoIP and videoconferencing client for Microsoft Windows, but this service in particular is necessary to remote desktop access.
- Remote Desktop Help Session Manager – This service is used by the Remote Assistance feature that you can use to allow others remote access to the system to help you troubleshoot problems.
- Remote Registry – The capabilities provided by the Remote Registry service are frightening to consider from a security perspective. They allow remote users (in theory, only under controlled circumstances) to edit the Windows Registry.
- Routing and Remote Access – This service bundles a number of capabilities together, capabilities that most system administrators would probably agree should be provided separately. It is rare that any of them should be necessary for a typical desktop system such as Microsoft Windows XP, however, so they can all conveniently be turned off as a single service. Routing and Remote Access provides the ability to use the system as a router and NAT device, as a dialup access gateway, and a VPN server.
- Simple File Sharing – When a computer is not a part of a Microsoft Windows Domain, it is assumed by the default settings that any and all filesystem shares are meant to be universally accessible. In the real world, however, we should only want to provide shares to very specific, authorized users. As such, Simple File Sharing, which only provides blanket access to shares without exceptions, is not what we want to use for sharing filesystem resources. It is active by default on both MS Windows XP Professional and MS Windows XP Home editions. Unfortunately, this cannot be disabled on MS Windows XP Home. On MS Windows XP Professional, however, you can disable it by opening My Computer -> Tools -> Folder Options, clicking the View tab, and unchecking the Use simple file sharing (Recommended) checkbox in the Advanced settings: pane.
- SSDP Discovery Service – This service is used to discover UPnP devices on your network, and is required for the Universal Plug and Play Device Host service (see below) to operate.
- Telnet – The Telnet service is a very old mechanism for providing remote access to a computer, most commonly known from its use in the bad ol’ days of security for remote command shell access on Unix servers. These days, using Telnet to remotely manage a Unix system may be grounds for firing, where an encrypted protocol such as SSH should be used instead.
- Universal Plug and Play Device Host – Once you have your “Plug and Play
Please contact tech support for a BIOS update that will support dual HDMI monitors.
- Log on to the thin client as administrator
- Change the ThinClientUser profile to an administrator.
- Move the DOS prompt into the startup for ThinClientUser
- Type regedit at the DOS prompt and modify the following entries setting them to 0
- [HKEY_CURRENT_USER\Software\Microsoft\Windows\CurrentVersion\Policies\Explorer]
"NoNetConnectDisconnect"=dword:00000001"NoNetworkConnections"=dword:00000001"NoStartMenuNetworkPlaces"=dword:00000001 - [HKEY_CURRENT_USER\Software\Microsoft\Windows\CurrentVersion\Policies\Network]
"NoEntireNetwork"=dword:00000001
- [HKEY_CURRENT_USER\Software\Microsoft\Windows\CurrentVersion\Policies\Explorer]
- Map the network drives
- Once the drives are mapped remove the DOS prompt from the ThinClientUser startup and revert the user priviledges
- If EWF is on make certain you save changes
As of January 2018, 10ZiG Technology is aware of the recent outbreak surrounding Spectre and Meltdown. 10ZiG Technology is working with their upstream suppliers to confirm which models are affected, in addition to patching levels available for the appropriate models. Further information on this topic will be posted as made available and can be requested by contacting 10ZiG Technical Support.
support@10zig.com 866-864-5250 ext. 1 / support@10zig.eu +44 (0) 116-2148650
10ZiG Windows Embedded 8
Please contact tech support for a BIOS update that will support dual HDMI monitors.
Click Here for step by step instructions on how to lock down your Embedded Windows 8 thin client.
Once you have performed the necessary registry edit explained in the pdf, the following video demonstrates the lock down process.
UWF is Unified Write Filter - please see documents below for more information.
Unified Configuration Tool Walkthrough_LH.PDF
As of January 2018, 10ZiG Technology is aware of the recent outbreak surrounding Spectre and Meltdown. 10ZiG Technology is working with their upstream suppliers to confirm which models are affected, in addition to patching levels available for the appropriate models. Further information on this topic will be posted as made available and can be requested by contacting 10ZiG Technical Support.
support@10zig.com 866-864-5250 ext. 1 / support@10zig.eu +44 (0) 116-2148650
10ZiG Windows Embedded Standard
Go to: start|run regedit
GFind key:
HKEY_LOCAL_MACHINE\Software\Microsoft\Windows\CurrentVersion\Explorer\Desktop\NameSpace\10995051-69E9-4dd-A8AE-326C588F0FF0
Remove that last key the 10995051-…. Just right-click and choose remove.
That will remove it from the desktop.
Click Start, then click Run or go to Start/All Programs, Administrative Tools/Local Security Policy.
Type secpol.msc and then click OK.
Go to software restriction policies, right-click on Additional Rules.
Left-click New Path Rule...
Under Path, enter the patch to Internet Explorer (default path is C:\Program Files\Internet Explorer\IEXPLORE.EXE
Under Security Level, be sure that Security Level is set to Disallowed.
Click Apply.
The issue is the USB port. The scanner will work on USB ports lower than 2.0 but if the unit has a 2.0 USB port a USB hub is needed for the scanner to work.
The on-board video chip may handle a wide screen but maximum resolution is based both monitor and video chip. Contact sales to find out which models support higher resolutions. There are a couple of options and on some models you can purchase a PCI video card that handles wide screen (10ZiG Technology sells PCI video cards that can do wide screen).
Windows OS
To determine the BIOS version, edit the registry and check the BIOSVersion key - example below:
Linux
Access a console(shell) using SHIFT+CTRL+ALT+0 (do not use 0 on keypad) or settings/terminal properties - system - advanced - console.
From a shell type # dmidecode |more - the top of the file will include the BIOS version - example below:
Do the following process without the headset plugged in.
- Download the zip file below and extract
- Please copy the information file, wdma_usb.inf, to the C:\windows\inf folder.
- Right click on it and install it.
- Copy the system file, usbaudio.sys, to c:\windows\system32\drivers folder.
- Commit the changes.
- Plug in the headset and if you are prompted for the file go to drivers section
- Make sure in sounds the default device indicates the headset
Edit the registry
Find the registry key under HKEY_LOCAL_MACHINE\SOFTWARE\Microsoft\MSLicensing
Note:
This works with local and domain admin only and not domain user.
Right click on MSLicensing and select Permissions
Select Advanced
Highlight Users(Local Computer Name) Select Edit
Make certain the permissions are set as below:
Right click on Hardware ID and select Permissions
Select Advanced
Highlight Users(Local Computer Name) and select Edit
Make certain the permissions are set as below:
Select OK all the way back to the registry key.
Right click on Store and select Permissions
Select Advanced
Highlight Users(Local Computer Name) and select Edit
Make certain the permissions are set as below:
Save all the way out, close registry editor and you should no longer get the error.
Turn off prompt local user to accept incoming connections in VNC Server Properties (Service-Mode) and in VNC Server Properties (User-Mode).
See the Word document below directions. The zipped file is the dll you will be missing.
When installing Bluetooth devices on xp embedded there are a list of steps that must be taken.
- Do not plug in the Bluetooth device.
- Install the wincomm drivers they are located in the product folder under Bluetooth – Winncomm
- After installing the drivers insert the Bluetooth device
- Update the driver for Generic Bluetooth radio use the INF folder in the Bluetooth – Winncomm folder (ONLY FOR USB DEVICES) otherwise skip this step
- Right click on the Bluetooth icon in the system tray and start bluetooth
- Then walk through the wizards (There is help files in the Bluetooth – Winncomm directory under user guides. Please review them
- Then connect the Bluetooth device
- If it is a WASP scan gun install the utility located in the Bluetooth – Winncomm folder
- Start that program up and connect to the appropriate com port.
!! You must install the Bluetooth a certain way or it will not work !!
Bluetooth Wireless Scanner.doc
Go to Start - Run
type control userpasswords2 - press Enter or OK
uncheck the Users must enter a user name and password to use this computer
Enter the user name and password associated.
Save the changes
Reboot the system
In the BIOS go to Integrated Peripherals -> Onboard PCI Devices -> LAN Boot ROM set to enable
CTRL SHIFT F12 - will log you off - log back in as administrator with password admin.
- Press DEL as thin client is booting to enter the BIOS
- Enter password 10ZIG
- Select Integrated Peripherals
- Change Onboard LAN Boot ROM to Enabled
- Press F10 - Save and Exit
- Enter BIOS again
- Select Advanced BIOS Features
- Change First Boot Device to LAN or Realtek
- Thin client will attempt to PXE boot
- After changing the Integrated Peripherals - press F10 to save and exit. Press F12 while booting to access the boot menu and select the LAN option
Then:
or
No, PXE is part of BIOS and the BIOS only knows about the built in NIC.
Go to C:\BGINFO and run the BOS.BGI, just run it and select OK and it will update.
- Disabling the local sounds on the device helps sync the voice with the images.
- The graphics card settings improve the video
- Graphics properties- 3D settings- buffering- DEPTH, BUFFER, BIT DEPTH» Change to +24 bit depth buffer.
- Tripple buffer » ON
- Change screen resolution to 16 bit.
- Turn off windows sounds.
- Turn to classic windows theme
- Deleted every non essential program and client (RDP 7.0 essential) to free up as much RAM as possible.
The patch that fixes daylight saving time is below. Sign on to the thin client as administrator. After downloading the zip file make certain you extract the file and save it as an exe file. After running the program make certain changes are committed or they will be lost.
When the thin client is shipped it has the power options set to Portable/Laptop as below:
NOTE: Not all models support dual monitor.
When trying to use a second monitor the DVI connected one will be the primary and the VGA connected monitor will be the extended. A real DVI connection is needed to make this work, using a DVI to VGA converter will confuse the hardware and make it act though both are the VGA port and send the extended desktop to both monitors.
Uncheck all options in the RDP experience tab.
Please obtain the new XTC Agent package from here:
http://www.10zig.com/thinclient/downloads/xtc_agent/XtaSetup_v2.0.1.1.exe
To disable the startup of the tray application altogether, as well as the ability to disable the context menu and hide the EWF tray ICON follow the steps below:
In the Windows Registry: (Make certain to either disable EWF prior to doing the following or commit the changes afterwards.)
- Navigate to the “HKEY_LOCAL_MACHINE\SOFTWARE\10ZiG\XTC Agent
- You will need to use a USB hub and attach a keyboard and the USB thumb drive to the tablet
- Select Hard Drive as the first boot device which will take you to a screen where you can move the USB thumb drive to the top using the + key
- Reboot with the USB thumb drive still in the USB hub attached to the tablet
- Restore the image
You have to log in as that user so the hive is loaded for that user and you have to add the registry hacks.
Below is a link that tells you where and what searches to use if applicable
http://www.winvistaclub.com/t78.html
Pay close attention to:
NoSearchCommInStartMenu : If enabled Start Menu search will not search for Communications.
NoSearchProgramsInStartMenu : If enabled Start Menu search will not search for Programs.
NoSearchInternetInStartMenu : If enabled Start Menu search will not search for Internet History
NoSearchFilesInStartMenu : If enabled Start Menu search will not search for Files
Enable num lock at startup
- Click Start, click Run, and type regedit to open the Windows registry editor.
- In the registry, open the below folders.
- Within the keyboard folder, you should have a string value named "InitialKeyboardIndicators" with a value of 0, 1, or 2. Below is the explanation of each of these values.
- Set it to a 2
HKEY_CURRENT_USER\
Control Panel\
Keyboard\
0 = Num Lock is turned OFF after the logon.
1 = Disable Num Lock.
2 = Numlock is turned ON after the logon.
To default any new user to have it automatically set to ON
- Click Start, click Run, and type regedit to open the Windows registry editor.
- In the registry, open the below folders.
- Within the keyboard folder, you should have a string value named "InitialKeyboardIndicators" with a value of 0, 1, or 2. Below is the explanation of each of these values.
- Set it to 2
HKEY_USER\.DEFAULT
Control Panel\
Keyboard\
0 = Num Lock is turned OFF after the logon.
1 = Disable Num Lock.
2 = Numlock is turned ON after the logon.
OR
Resolution:
CREDSSP must be enabled in the RDP fileOpen the rdp file with notepad and add the following line:
enablecredsspsupport:i:0
Save the rdp file
The KB below is for Quest using MR1 and the RDP connection provided by Quest Provision Networks VWorkspace. If the VM you are attaching to is WIN 7 SP1 or 2008 R2 SP1 you need this KB installed on the VM.
KB Article Number(s): 2526946
Make certain the date is correct on the thin client.
Some devices in this table are supported by RemoteFX USB redirection. Other devices in this table are supported by high-level device redirection mechanisms. Devices not listed in the table will be processed by using RemoteFX USB redirection; they may work, but are not considered officially supported.
Disable the following services
- IIS – Microsoft’s Internet Information Services provide the capabilities of a Webserver for your computer.
- NetMeeting Remote Desktop Sharing — NetMeeting is primarily a VoIP and videoconferencing client for Microsoft Windows, but this service in particular is necessary to remote desktop access.
- Remote Desktop Help Session Manager – This service is used by the Remote Assistance feature that you can use to allow others remote access to the system to help you troubleshoot problems.
- Remote Registry – The capabilities provided by the Remote Registry service are frightening to consider from a security perspective. They allow remote users (in theory, only under controlled circumstances) to edit the Windows Registry.
- Routing and Remote Access – This service bundles a number of capabilities together, capabilities that most system administrators would probably agree should be provided separately. It is rare that any of them should be necessary for a typical desktop system such as Microsoft Windows XP, however, so they can all conveniently be turned off as a single service. Routing and Remote Access provides the ability to use the system as a router and NAT device, as a dialup access gateway, and a VPN server.
- Simple File Sharing – When a computer is not a part of a Microsoft Windows Domain, it is assumed by the default settings that any and all filesystem shares are meant to be universally accessible. In the real world, however, we should only want to provide shares to very specific, authorized users. As such, Simple File Sharing, which only provides blanket access to shares without exceptions, is not what we want to use for sharing filesystem resources. It is active by default on both MS Windows XP Professional and MS Windows XP Home editions. Unfortunately, this cannot be disabled on MS Windows XP Home. On MS Windows XP Professional, however, you can disable it by opening My Computer -> Tools -> Folder Options, clicking the View tab, and unchecking the Use simple file sharing (Recommended) checkbox in the Advanced settings: pane.
- SSDP Discovery Service – This service is used to discover UPnP devices on your network, and is required for the Universal Plug and Play Device Host service (see below) to operate.
- Telnet – The Telnet service is a very old mechanism for providing remote access to a computer, most commonly known from its use in the bad ol’ days of security for remote command shell access on Unix servers. These days, using Telnet to remotely manage a Unix system may be grounds for firing, where an encrypted protocol such as SSH should be used instead.
- Universal Plug and Play Device Host – Once you have your “Plug and Play
Make certain after any changes are make that you double click on the ICON that says Flash Disk Write Protection. Click on Commit changes.
OR
Rigth click on the and select commit changes
The reason why this occurs is that domain and PC exchange a secret key behind the scenes and the default time limit on this exchange is 30 days. When EWF is enabled and the PC gets rebooted and the change that has occurred is not saved in the registry. The work around for this is:
Start|Run
Type regedit
Go to key
[HKEY_LOCAL_MACHINE\SYSTEM\CurrentControlSet\Services\Netlogon\parameters]
Locate parameter on right side
Disablepasswordchange it is set to 0
Change it to a 1
Save changes
The keyclass="answer" modified to get Citrix or RDP to work with the XPe thin client is located at:
HKEY_LOCAL_MACHINE\SOFTWARE\Microsoft\MSLicensing
Modify the security on this key and the three subkeys. Right click on each key, then click on permissions on the menu. Click on "Advanced" for special permissions. Click on "Edit" to the the Users group. Click the checkbox to enable the "Set Value" and "Create Subkey" security settings. Enable those settings on the MSLicensing key and the HardwareID, Store, and LICENSE000 subkeys.
Reset the CMOS - with the power off, remove the cover and find the battery. Next to the battery you will find a yellow or orange jumper. Move it from the middle and end to the middle and opposite end for approximately 10 seconds then move back to the original position.
You may get this with bad memory. Always answer NO, shut down unit, put correct memory in unit and it will come up fine. If you answer YES, you will corrupt the DOM.
Create an RDP profile and add it to the start-up menu/start-up folder.
The XPe thin client image is built with a blank administrator password and RDP requires a password and will not connect without one.
When checked it uses Remote HTTP but that is not in the virtual build. Copy the rhttpaa.dll (zip file below) to the windows\system32 folder and save the changes. When this box is unchecked, it does not use remote HTTP when connecting.
Select File - Add/Remove Snap-In
Select Group Policy Object Editor and select Add
Select Finish
Double click on the desired setting on the right.
Select OK - Save and Exit
Go to Start - Run
type control userpasswords2 - press Enter or OK
Check the Users must enter a user name and password to use this computer.
To force the user to press control alt delete to log on go to the Advanced tab and check Require users to press Ctrl+Alt+Delete.
Save the changes
Reboot the system
It now prompts to login
Force Users to Enter a User Name and password
- Go to Start - Run
- Type control userpasswords2 - press Enter or OK
- Check "Users must enter a user name and password to use this computer"
- Save the changes
- Reboot the system
For Automatic Log on
- Go to Run and type control userpasswords2
- Uncheck the users must enter a username and password to use this computer
- Enter the user name and password that will automatically log in on boot
- Save the changes
- Reboot the system
NOTE: If the thin client has been joined to a domain, registry keys must be added. Once the thin client has been added to a domain, the option "Users must enter a user name and password to use this computer" will no longer be displayed.
To use the Registry Editor to add your log on information follow the steps below:
- Click Start, click Run, type regedit, and then click OK.
- Locate the following registry key:HKEY_LOCAL_MACHINE\SOFTWARE\Microsoft\Windows NT\CurrentVersion\Winlogon
- Using your account name and password, double-click the DefaultUserName entry, type your user name, and then click OK.
- Double-click the DefaultPassword entry, type your password under the value data box, and then click OK.If there is no DefaultPassword value, create the value. To do this, follow these steps:
- In Registry Editor, click Edit, click New, and then click String Value.
- Type DefaultPassword as the value name, and then press ENTER.
- Double-click the newly created key, and then type your password in the Value Data box.
- Double-click the AutoAdminLogon entry, type 1 in the Value Data box, and then click OK.
- In Registry Editor, click Edit, click New, and then click String Value.
- Type AutoAdminLogon as the value name, and then press ENTER.
- Double-click the newly created key, and then type 1 in the Value Data box.
- Exit Registry Editor.
- Click Start, click Restart, and then click OK
Note: If the DefaultPassword registry entry does not exist, Windows XP automatically changes the value of the AutoAdminLogonregistry key from 1 (true) to 0 (false) to turn off the AutoAdminLogon feature after the computer is restarted.
If there is no AutoAdminLogon entry, create the entry. To do this, follow these steps:
In all cases if EWF is enabled changes must be commited before rebooting - if EWF is not enabled then no saves are required.
Three ways:
#1

#2 From the registry information
<
#3 From the OEMINFO.INI in Windows\System32
Some thin client models do support LEAP and PEAP - please contact sales at 866-865-5250 for further information
TWEEK option:
From Windows Explorer -
Delete the Windows/CSC directory and from Tools --> Folder Options --> Offline Files --> Uncheck Offline Files and apply the changes.

Edit the registry:
My Computer\HKEY_LOCAL_MACHINE\SOFTWARE\Microsoft\Windows\CurrentVersion\Run
Delete BGInfo
Close registry editor and commit changes.
When installing a printer, windows may prompt you for the installation CD. We provide 2 CDs when the units are shipped, the XP recovery CD and the Thin Client Management Software CD. The Thin Client Management Software CD contains the cab file that you will need in the Utils\prtdrv folder. The name of the file is DRIVER.CAB file.
p>To remove the automatic load of Change Server—Citrix Neighborhood Agent on boot, right click on START and select EXPLORE. Click to expand local disk C —> click to expand Documents and Settings —> click to expand All Users —> click to expand Start Menu —> click to expand Programs —> click to expand Startup —> delete Program Neighborhood Agent. If write protected please commit changes!
The Ramdisk driver we use for this guide is almost identical and based on the Microsoft sample driver described here: Microsoft KB 257405. The version we use in this article fixes a bug with Windows XP and NTFS partitions (described in the MS KB article) and adds the ability to change drive letter and disk size in a more user-friendly way, using the Device Manager.
We can install/configure the Ramdisk in three simple steps:
- Download and uncompress the Ramdisk driver in an empty directory you can remember: Ramdisk Driver
- In Control Panel -> Add/Remove Hardware, select Add a new device -> select hardware from a list -> Other(All) devices -> Have Disk, then point to the folder that contains the RAMDisk.inf file you extracted in step 1. Click next/finish to complete the driver installation.
- You can change the size / drive letter of your new Ramdisk from the Device manager: Right-click on My Computer, select Properties -> Hardware -> Device Manager -> expand the RAM Disk -> Properties
At this point you have successfuly installed and configured a RAM Disk drive on your system. Keep in mind that the contents of the RAM disk are lost when changing its size and/or drive letter in Device Manager! They are also lost if power is lost, computer rebooted, etc. You might want to reboot and copy some files to your new RAM disk from within Windows Explorer to ensure it's operating properly.
Notes: In Windows XP, you might have to go to Control Panel -> System to access the device manager. Depending on your OS, you might be prompted to reboot after the drive is installed. Keep in mind that the size of your Ramdisk is substracted from the available RAM, so don't use any wild values. Depending on the intended use, 1 - 16 MB should be the enough, even in systems with plenty of RAM.
If the XPe thin client has the 10ZiG agent installed on the image, it needs to be disabled in the registry.
Edit the registry using regedit
Find HKEY_LOCAL_MACHINE\SOFTWARE\10ZiG\XTC Agent
Find the dword value name EnablePXE
By default it is set to 0. Change it to a 1
Exit the registry editor
If write protection is enabled, commit the the changes.
It is the auto USB redirection caused by the Citrix desktop appliance lock, to get round it you have to add a registry key:
[HKEY_LOCAL_MACHINE\SOFTWARE\Citrix\ICA Client\GenericUSB\Devices\VID148F PID2770] (vid and pid in this tcs case, this will vary depending on the wireless device used – you can get the VID and PID from device manager, wireless card properties and hardware ID)
Under that key, create a DWord called ‘Autoredirect’ and set the value to 0.
This stops it from attempting to redirect the wireless device to the Citrix session and restarting the thin client.
The original article is here: http://support.citrix.com/article/CTX123015
Yes it will work. The problem that still exists is that when you do a warm boot (restart) the fourth monitor does not come up, however if you power down completely and then do a cold boot or a normal power up the fourth monitor will initialize.
Older images in XPe SP2 and SP3 will have an issue since the Flash and Shockwave installer certificates have changed.
Updated Flash and Shockwave no longer use the Verisign Class 3 Root GA Certificate. Newer images will have the current certificate in them, however, customers who have the older images and want to update Flash or Shockwave will have an issue - the browser will show the .cab file trying to run from the website which will be untrusted and will not be allowed to install.
The certificates can be found in the zip file below:
VeriSign Class 3 Public Primary Certification Authority - G5.zip
Both certificates are needed. To install unzip the files and double click on each certificate and follow the prompts.
NOTE: WES 7 will not have this issue
Press CTRL+ALT+DEL - take the option to LOGOFF. While logging off hold the right shift key and continually tap the left shift key until you are presented with a logon box. Log on as administrator.
The Ramdisk driver we use for this guide is almost identical and based on the Microsoft sample driver described here: Microsoft KB 257405. The version we use in this article fixes a bug with Windows XP and NTFS partitions (described in the MS KB article) and adds the ability to change drive letter and disk size in a more user-friendly way, using the Device Manager.
We can install/configure the Ramdisk in three simple steps:
- Download and uncompress the Ramdisk driver in an empty directory you can remember: Ramdisk Driver
- In Control Panel -> Add/Remove Hardware, select Add a new device -> select hardware from a list -> Other(All) devices -> Have Disk, then point to the folder that contains the RAMDisk.inf file you extracted in step 1. Click next/finish to complete the driver installation.
- You can change the size / drive letter of your new Ramdisk from the Device manager: Right-click on My Computer, select Properties -> Hardware -> Device Manager -> expand the RAM Disk -> Properties
At this point you have successfuly installed and configured a RAM Disk drive on your system. Keep in mind that the contents of the RAM disk are lost when changing its size and/or drive letter in Device Manager! They are also lost if power is lost, computer rebooted, etc. You might want to reboot and copy some files to your new RAM disk from within Windows Explorer to ensure it's operating properly.
Notes: In Windows XP, you might have to go to Control Panel -> System to access the device manager. Depending on your OS, you might be prompted to reboot after the drive is installed. Keep in mind that the size of your Ramdisk is substracted from the available RAM, so don't use any wild values. Depending on the intended use, 1 - 16 MB should be the enough, even in systems with plenty of RAM.
Oracle (Java) recently changed their Certificate Authority resulting in an message that the certificate cannot be verified. We will be updating XPe (WES09) builds with the new certificate but for now the options to stop the SSL warning are as follows:
- Remove it out of the registry HKLM\Software\Microsoft|windows\current version\run
- Remove Sunjavaupdates this needs to be done to every machine. However, when a website uses java it may bring the error message back by adding the Sunjavaupdates back into the registry.
- Install the cert above new trusted root for UserTrust it is like a GoDaddy and GeoTrust - java.cer
- MMC – computer account and import again to all thin clients
- If Java is not needed it can be removed from the thin client
Right click on Computer and go to properties – from the Advanced Tab select Environment Variables
Select the TEMP variable under user variables and edit it
Change to the User Profile Temp Directory
Make certain the system variable TEMP is set to the C Drive and not to the RAMDISK
Once all this is changed you can remove the RAMDISK folder
As of January 2018, 10ZiG Technology is aware of the recent outbreak surrounding Spectre and Meltdown. 10ZiG Technology is working with their upstream suppliers to confirm which models are affected, in addition to patching levels available for the appropriate models. Further information on this topic will be posted as made available and can be requested by contacting 10ZiG Technical Support.
support@10zig.com 866-864-5250 ext. 1 / support@10zig.eu +44 (0) 116-2148650
Tera2 Host Card
PCoIP Host Software for Windows 4.3.1 only runs on Windows 7 64-bit and Windows 10 64-bit.
PCoIP_Host_Software_for_Windows_64-bit
To run Host Software on another Windows OS, including XP, Vista, Windows 7 32-bit and Windows 8.1 64-bit, use PCoIP Host Software for Windows 4.2.2.
PCoIP Host Software for Windows 32-bit 4.2.2
Tera2_Remote_Workstation_Card_Firmware_4.9.0_GA_Package.zip
Tera2 PCoIP Zero Client 4.x and Remote Workstation Card 4.9 Administrators’ Guide
Guides are included in the zip files!
Teradici PCoIP zero clients and host cards do not support VLAN tagging. If an environment requires VLAN tagging, the implementation of a network device's (switch / router) VLAN options such as port based VLANs or VLAN tagging is recommended.
There are three common causes for seeing this message in a host card environment:
- Cabling
- Software settings
- No OS installed on the host
To troubleshoot, first check the DVI connection between the GPU and the PCoIP host card. If the cable(s) appears to be connected properly, confirm that there is a video output by connecting the DVI port of a monitor directly to the GPU's DVI output port. In order for this diagnostic step to be valid, you must not use any adapters (ie: DVI-to-VGA) between the GPU and monitor. Note: PCoIP host cards support DVI inputs only. They don't support VGA inputs, but can support VGA signals through DVI-I connectors. While host cards support DVI input only, VGA can still be supported on the client. See client product specifications to determine if VGA output is supported.
This message may appear for a few minutes when the host PC/workstation OS turns off the monitor due to power management settings, screen saver timeout, or monitor shut down settings. The overlay appears shortly after the monitor is turned off and remains active for a couple minutes before it is eventually removed at which time the monitor is turned off.
This message will appear if there is no operating system installed on the host PC.
This error can appear for the following reasons
- The PC does not have a PCoIP Host Card installed
- The "Host Driver Function" checkbox is not checked on the host SW configuration -> Host Driver Function page
In the second case you MUST reboot the PC and reattempt to install the software as directed below:
- Go to the web address of the host card itself by entering it into to a web browser. Click on the log in button, go to configuration and then Host Driver function.
- Check the box to “Enable Host Driver Function
Apex Card
v2.5.3 for ESXi 5.1
Drivers_Package_2.5.3_for_Hardware_Accelerator_ESXi5.0.zip
v2.5.3 for ESXi 5.1
Drivers_Package_2.5.3_for_Hardware_Accelerator_ESXi5.1.zip
v2.5.3 for ESXi 5.5
DDrivers_Package_2.5.3_for_Hardware_Accelerator_ESXi5.5.zip
v2.5.3 for ESXi 6.0
Please see the APEX_install document in the previous FAQ.
The Teradici APEX 2800 Server Offload Card provides hardware accelerated image encoding for virtual desktops. The card will automatically detect which desktop displays will benefit most from hardware acceleration and seamlessly switch image encoding from the server's CPU to the APEX 2800 card.
From a high-level, the installation steps are as follows, for more detailed information read the Quick Start Guide available on this page.
- Download the latest APEX 2800 drivers and software
- Install the APEX 2800 in the server
- Install the ESXi driver package
- Reboot the ESXi server
- Install the APEX 2800 software in the virtual machines
- Verify virtual machine pool/global policy settings
- Shutdown the virtual machine and power on again (VM reboot/reset is not sufficient)
- Verify APEX 2800 status
- Verify hardware offload for virtual machine.
Please create a free account on or log in to http://www.teradici.com and view the KB listed below:
APEX 2800 Dashboard and Simulation Tools to Evaluate and Test the Server Offload Card (15134-761)
Tera1/V9000
NOTE: Do not use Google Chrome to update as it will error with an upload already in progress message
The zip file below contains the latest firmware for the Tera1 zero clients.
The driver comes as a component within the PCoIP Component Installer. The Teradici's virtual audio driver provides bi-directional analog and locally terminated USB audio support for virtual desktops using PCoIP Software such as VMware Horizon.
To reset the password from the zero client click on Options -> Password -> Reset.
This will present you a Challenge, send this to support@10zig.com and we can get you the response.
No, only the Tera2 will allow you to set the montitors to mirror - OSD - Options - Display - Enable Display Cloning.
Teradici PCoIP zero clients and host cards do not support VLAN tagging. If an environment requires VLAN tagging, the implementation of a network device's (switch / router) VLAN options such as port based VLANs or VLAN tagging is recommended.
PCoIP Management Console
- Create or Sign into Teradici account
- Download the PCoIP Console 1.10.x and release notes – This console can be used with devices using firmware version 4.8 or below which is the default for 10ZiG Zero Client evaluation products.
- Download the PCoIP Console 2.x and release notes – This is for users on Firmware 5.0 and higher and is free for up to 2000 users.
10ZiG NoTouch
Please contact support@10zig.com for a link to download NoTouch PC Repurposing Packages.
To change the wallpaper in NoTouch log into the configuration either locally, via browsing to the IP or using the Manager and configure the settings under Management, Display settings.
You will need to have to have a URL of a jpg, bmp etc. So if you have an internal webserver, (or use the NoTouch Center Manager to host images and use the following folder http://admin@IP.AD.DR.ES/bg) or as most companies have an intranet portal with a company logo on it, you can enter the url as seen below
Dual extended and mirrored monitors are supported but not independent monitors.
Please download the form below, complete it and fax/email it to your nearest 10ZiG location at the bottom of the form.
Used by our legacy NoTouch Desktop customers with older equipment, K206 includes as much support as possible for your oldest hardware but should still run reasonably well on existing business PCs that are around two years old (from their manufacturing date).
K313 is only used in rare cases when other editions (K206 or K305) experience anomalies with the graphics output or other hardware peripherals. A broad spectrum of devices range from very new graphics chips to a selection of very low-priced new netbooks, and occasionally we have found that the K313 is also a good fit for new business or professional level PCs.
Click Here to Download your NoTouch Desktop K313 update file.
To do this on the NoTouch Client go into the Configuration, then to Drives/Printer then click on Shared Drives. Add a shared drive and set:
- "Windows Drive letter
The later versions of Chrome have blocked certain plugins until they are manually enabled using the following. More information can be found on an article from Java.
https://java.com/en/download/faq/chrome.xml
Enabling NPAPI in Chrome Version 42 and later
As of Chrome Version 42, an additional configuration step is required to continue using NPAPI plugins.
- In your URL bar, enter: chrome://flags/#enable-npapi
- Click the Enable link for the Enable NPAPI configuration option.
- Click the Relaunch button that now appears at the bottom of the configuration page.
As of Chrome 45, the override and NPAPI was permanently removed. Installed extensions that require NPAPI plugins will no longer be able to load those plugins.
122 Keyboard
The Apps Key simulates the Windows Key
BOSaNOVA Web
The job initiation phase begins and if there is no OVRPRTF, the system looks at the following values:
- The output queue value in the job description.
- The output queue value in the user profile.
- The output queue value in the workstation description.
- The printer device value in the job description.
- The printer device value in the user profile.
- The printer device value in the workstation description.
- The system value Default printer (QPRTDEV). If the printer identified in the system value does not exist, the output goes to the QPRINT output queue.
There are a few suggestions in the document below - if the issue continues after trying the steps, please call Tech Support
Suggestions to install and run the BNW client on a Windows 7 machine.pdf
As of April 2015 NPAPI support is disabled in Google Chrome and all browser extensions that require NPAPI plugins will be unpublished from the Chrome Web Store
Previous to September 2015 there is a work around by going to chrome://flags/#enable-npapi in your Chrome browser. Find Enable NPAPI Mac, Windows Enables the use of NPAPI plugins #enable-npapi and Enable it.
BOSaNOVA Secure
The job initiation phase begins and if there is no OVRPRTF, the system looks at the following values:
- The output queue value in the job description.
- The output queue value in the user profile.
- The output queue value in the workstation description.
- The printer device value in the job description.
- The printer device value in the user profile.
- The printer device value in the workstation description.
- The system value Default printer (QPRTDEV). If the printer identified in the system value does not exist, the output goes to the QPRINT output queue.
ThinDesktop™
Previously when the thin client was shipped it had the power options set to Portable/Laptop and if Thin Desktop™ was installed without making any changes, the user ThinLaunch Thin Desktop creates will have the same power setting. Please contact Tech Support for further assistance on correcting the power setting.
To regain access to the windows desktop, press CTRL-ALT-DEL and select logoff from the dialog. Upon logoff, hold down the SHIFT key to allow Windows to display the logon dialog. At this point, any local or domain user who has the appropriate permission can logon to the system and see a normal Windows desktop. See the below figures on how to complete.
After pressing CTRL-ALT-DEL click on Log Off…
Confirm by clicking Log Off and hold down the shift key
Change the ThinDesktopUser to another valid user and the desktop interface will reappear
To use Thin Desktop™ with the Citrix ICA client, also known as XenApp, it is necessary to configure Thin Desktop™ to launch wfica32.exe directly instead of using Program Neighborhood (pn.exe). To do this requires an ICA file to be created with the appropriate connection information. The following describes the procedure to create an ICA file:
- Create an ICA file from the Citrix published application manager tool.
- Copy the ICA file to the client where Thin Desktop™ is installed. Be sure to place the ICA file in an area where the local Users group has read access rights.
- Configure Thin Desktop™ to launch wfica32.exe with the path of the ICA file passed as a parameter. The following is an example: “C:\Program Files\Citrix\ICA Client\wfica32.exe
Because Thin Desktop™ only monitors the first process launched, if a second process is spawned from the first process, Thin Desktop™ will not have the ability to monitor the child process to perform a re-launched if it closes prematurely.
Any command launched by Thin Desktop after startup of Windows is executed in the context of the user session of the local Windows user ThinDesktopUser. As a result, it is necessary to ensure the proper permissions are given to ThinDesktopUser to launch the desired command. Since ThinDesktopUser is also part of the Users group by default, permission could be given to that group instead of the user directly.
Please review KB article:
Customers will need to uninstall KB3045999, choose not apply it or upgrade to ThinDesktop 3.x before KB3045999 can be applied.
ProximityPrint Q
10ZiG Tablets
To make changes to the Button Manager setting using the registry do the following:
- Open the regedit.exe utility on the unit you have configured the Button Manager settings to suit your needs
- Plug a USB Flash Drive into the unit
- Go to the registry key "HKEY_CURRENT_USER\Software\DT Research\BtnManagement"
- Click on the Files command and select Export…
- Give the file (*.reg) a name, may be BM.reg
- Save it to the USB Flash Drive
- On another unit or a new user profile, you can plug in the USB Flash Drive to load the registry key
- Double click on BM.reg (reply yes to add the registry key)
- Then reboot the unit
- When the unit boots up, the BM settings for the new user account or on the new unit should be identical to the unit or user profile you’ve taken it from
We have a short video to demonstrate how this should work. (Please note this is not a professional video but created to help understand the process) CTRL+ALT+DEL_VIDEO
Download the file below and follow the process detailed in this FAQ.
BM2.2.1.42_KW2.5.0.19_PST1.0.0.24.zip
- Please remove the older Button Manager, Keyboard Wedge, and Peripheral Scanning Tool
- Reboot
- Install the downloaded new version
- Reboot
- Run Peripheral Scanning Tool first
- Reboot
- Button should be ready to use
Please be patient as it does take a short while after boot up for the button to work
Zignature Pad
Hardware Version 6 ONLY! (scroll down for version 5)
There are two files needed to update the firmware on the Zignature Pad. The latest bin file and the vpupdpad.exe program to update the firmware.
- Please save the files under %program files%\VPsign\VPort
- Right click on the VPort Agent icon on the taskbar and click Show Log.
- Run the vpupdpad.exe from VPort directory and browse the for the downloaded bin file.
- Press "Start Update" then after click "Close".
- Wait patiently until the VPad resume shows in the log.
- In the log window you will see…
- Wait approx. 30 seconds.
- Unplug and plug back in pad and your new firmware version will be displayed.
Updating Hardware Version 5
- To update the firmware just select the update option and restart the VPad by removed the supply power.
- If necessary, install the driver from " Program Files\VPsign\USB\driver".
- After power on the VPad will boot in update mode. The LCD will stay blank during this mode.
- Extract the files to directory on your computer and run the VpsBurnWiz.exe file.
- Follow the wizard guidance during the update until the VPad will boot with the new firmware. Do not plug off the USB and do not power off the VPad during the update process.
- Press finish in the update wizard.
- Done.
The Calibration and Firmware Update options were removed from the VpsAgent menu. In order to calibrate or update firmware, it is necessary to:
- Open command prompt, go to VPort folder, type ‘vpsagent /admin’, DO NOT press Enter
- Go to VpsAgent icon in notification area (System tray), right-click the vpsagent icon select Exit option and click it.
- Fast switch to command prompt (see item 1) and press Enter.
- New the calibration and update options will be available in the agent menu.
No there is no option for a fast forward. The pad securely encrypts the time spent on each page so that in the case where someone brings up the fact that they didn't notice a condition in the small print it is easy to prove. For example if they only spent 8 seconds on that page, or 28 seconds reading a 12 page contract.
Please download the document below:
ZiGnature Pad Installing the Certificate and Displaying the Signed Document Audit Trail.pdf
Click Here to download the Signature Wizard Designer User Guide.
CE Thin Clients
In order to do printing to a Thin Client printer via Windows or RDP, the LTC needs a static IP address and then add a printer in windows and make it local and create a a Standard TCP/IP port pointing at the IP address of the LTC. Then share the printer on the Terminal services server and use it in the RDP session. This is necessary because the LTC does not tell windows what type printer it has connected to it so Windows cannot determine which driver to use you have to tell it. This should then allow you to print to the USB printer from RDP.
The CE units do not support printers that use the LIDIL printer language.
CRTOUTQ OUTQ(MYOUTQ) +
RMTSYS(¨*INTNETADR) +
RMTPRTQ('usb') +
CNNTYPE(*IP) +
TRANSFORM(*YES) +
MFRTYPMDL(*NECP2) +
WSCST(QGPL/NECP2) +
INTNETADR(10.1.1.63) ====> IP of the network
Then issue the STRRMTWTR OUTQ(MYOUTQ)
To restore the registry of a unit that has an OS prior to CE 5.0 Pro to factory default, you have to delete or edit the registry file saved on the DOM.
There are three options:
- - turn on the unit and during first stage of boot (Bos splash bitmap with progress bar) press Ctrl+C to exit the boot program and go to the DOS prompt. The text color is black so you cannot see what you are typing.
- - boot the device from an USB device with DOS
- - ftp to unit's IP
- type cd docume~1
- type echo a > system.hv
- reboot the terminal
- type d: or c: to point the DOM (with a bios version the DOM drive letter is "d:" with other bios the DOM is "c:")
- type cd docume~1
- type echo a > system.hv
- reboot the terminal
- sign in with admin admin
- type bin
- get defpar
- reboot it is back to factory defaults.
The program was designed to perform this way in TBT/WBT mode. To view it normally you must run in Desktop mode.
If this happens you will need to change a parameter in the U700 or G700 BIOS in order for the WINCE to work with USB Keyboard, mouse and printer. In the BIOS, (DEL key on boot) go into "Integrated Peripheral" and then change the "USB Operation Mode" to Full/LOW Speed. **NOTE** If this happens we apologize as it should have been changed prior to shipping.
Make sure the Keyboard option in Local Resource is set to On the Local Computer. You will find it in the Control Panel under RDP Global Settings under the Local Resource Tab and in the session connection itself. Once this is set use CTRL + ALT + up or down arrow key. See images below:
It depends on the peripheral:
When pairing with a Bluetooth mouse or keyboard it uses HID.
When pairing with a Bluetooth printer it uses SPP.
A BIOS setting needs to be changed. In Integrated Peripherals - set USB Speed from High Speed to Full/Low Speed.
The firmware level must 5.2.18 or higher
- Put the thin client "desktop" modality
- Browse My Device and you should see an ICON for storage
- Browse Storage to find a subdirectory called Wallpaper
- Copy *.bmp files from a USB drive to this subdirectory
- From Terminal Properties - Desktop - Advanced options, browse to \storage\wallpaper
- Select the desktop background
NOTE: DO NOT delete any existing files in Storage (CMload.exe and the U720 directory). Otherwise \\storage can be used for any other type of local file storage. On factory default, the files on storage DO NOT get deleted.
The port will show up as LPT2 instead of a USB port.
Check to make sure the USB cable is 1.1 as the WTC-400 only supports USB 1.1, not 2.0. Also, make sure the printer is not an LIDIL printer as any LIDIL printers will not work.
The WTC only supports SAMBA shared printers and needs a name such as \\PCNAME\printersharename. If trying to connect to a network printer put it on a server and share it and then the WTC can connect to it.
The CE.net print screen functionality is working. The keyboard print screen key and the File|Print/Toolbar have different settings
If you go to the Print Screen configuration page shown in the image, you will see there is a setting for Print Screen menu option and a setting for the Print Screen key.
The setting of the Print screen key is shown below this:
By default the Print Screen menu option (File|Print and toolbar printer icon) are set to print locally (directly to a printer on the COM or LPT ports). You can change this using the combo to print thru host or disable it.
To change this, you need to Edit the keyboard mapping using the Edit button next to the keyboard type on the General page.
- Edit the properties of the session or Add it when creating the session, this is done on the “Options
The standard support for printing is through LPT, COM, USB and network printer (which means shared printers). For a customer in Italy we implement the LPR and RAW protocols in order to be able to print to a standard TCP/IP printer supporting either LPR or RAW. This implementation is unique and no one else has it available.
Unfortunately due to a lack of windows spooling system in the WINCE, there are some limitations that you should be aware. First, if there is no feedback about any of the printing errors (such as end of paper, offline, generic errors and so on). Second, the printing process is not initiated as a separate task. In other words, when you print from the browser the entire system is tied to the print process and the resources will not be released until the print job is completed. Using RAW instead of LPR is a little bit better but still until the print job has been printed the Terminal stays locked up.
R&D's suggestion is to use RAW instead of LPR, but still be aware of this lock situation.
Set the printer up in the standard WINCE Printer Configuration page depending on the application - select Printer Configuration:

In the Net Path field you have to enter the network printer address path.
To print RAW, enter this "non-standard" command:
//
Example: raw://192.168.0.12:9100